So this is a pretty simple concept, and just about everyone has made a pinwheel at one time or another, but I thought I would share how I like to make a pinwheel.
Materials:
12" x 12" Scrapbook Paper
CD
Straight Edge
Long sewing pins- make sure it has a round head on the end
Pencil with eraser
Wire Cutters
Hot Glue

1. Select a piece of two-sided scrapbook paper.
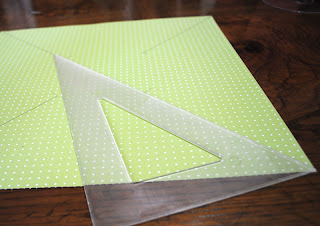
2. Put a cd in the center of your sheet of paper (it doesn't have to be exact, just near it), and mark 4 small lines in line with your corners. Read the next step and you will understand this better.
3. Line up a straight edge from one corner to the next and draw a line from the corner to the marks you made in the last step.
4. Cut along the lines you have drawn. Remember to stop at the marks you made in step #2.
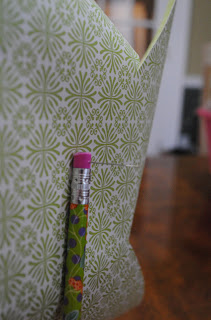
5. Insert your pin about 1/2" from each corner working your way around the paper.
6. Once you have all corners pinned, line up your pin in the center of the paper, and push it all the way through.
7. Push your pin through the eraser of the pencil- be very careful not to push your thumb against the eraser, your you will have a pinwheel attached to your thumb!
8. Cut off the excess pin on the back side. and pull the pin back just enough that you can't see it sticking out.
9. Put a dot of hot glue on the back of the eraser when the pin made a hole. This will keep the pin from poking through and hurting your little ones!
10. Sit back and admire your Giant Spinning Pinwheel!


How cool! Thanks for showing how to do this. I don't know why I assumed making pinwheels would be hard...it looks so simple! And cute :)
ReplyDeleteThanks for these easy-to-follow instructions!
ReplyDeleteHow COOL! I love pinwheels! I've never made one this big...but I'm gonna try now! :)
ReplyDeleteGreat tutorial!!! I've been meaning to try these, and can't wait now!!
ReplyDeleteWe host a linky party "Help a Momma Out Tuesdays" Would love it if you linked up! Thanks for sharing!!
Kristine
www.jandmseyecandy.blogspot.com
These would be fun to do with the kids- definitely pinteresting this!
ReplyDeleteI adore this idea! They would make such a big impact for not a lot of money at a party.
ReplyDeleteCute, it looks easy to do! Thanks for sharing! I hope you can join us at www.designgivesback.com August 12th-18th the Miracle Makeover reveal blog party. We appreciate you, let's join together to make a change!
ReplyDeleteMany Thanks,
Sherry, DGB Team
my kids would LOVE this! I so am going to try this with my boys!
ReplyDeleteCome link and party at my woot woot wednesdays @ thetootsiewootsie.com
http://www.thetootsiewootsie.com/2011/08/woot-woot-party-5.html
I've featured your crayon art tutorial today at http://www.craftbuds.com/fresh-picks-for-wednesday-8-10-11-slice-winner/ :)
ReplyDeleteI have always loved pinwheels! super tute!
ReplyDeletegail
What a great tutorial! Can't wait to make some! Thanks so much for linking up! Hope you have a great weekend! :)
ReplyDeleteCrystal
Homemaker in Heels
Awesome tutorial! I was transported back to the days of my youth!
ReplyDeleteI'm your newest follower.
How cute!
ReplyDeleteLove pinwheels! So much fun and always such a festive decoration! Thanks so much for sharing with the Pink Hippo party! Oh yeah.. and I am also your newest follower!
ReplyDeleteGreat tutorial! Thanks for linking to the Tuesday To Do Party!
ReplyDeleteSmiles!
Jami
www.blackberryvine.blogspot.com
Thanks for sharing how to do this! I've been looking everywhere for a tutorial! - you're a life saver!
ReplyDelete~Jessa
www.jessajill.blogspot.com
that is just so cute and summery. Who doesn't love a pinwheel? I just started a new link party on my blog today and I'd be honored if you'd join up with this. http://caribbeanmissionarywife.blogspot.com/2011/08/t-time-21-and-link-up.html
ReplyDeletehave a lovely day, Maria
That is so adorable. My daughter would love one of those. I must try it. Thanks for sharing at my Sizzle into Summer party.
ReplyDeleteLovely! Thanks for the tutorial!
ReplyDelete